Leaks & Service Repairs

757-399-3066 ext 3 (Leaks & Service Repairs)

Reroof Estimates & Inspections

757-399-3066 ext 1 (Reroof Estimates & Inspections)

Category: Roof Damage

DIY Roof Repairs: What Could Go Wrong

“What could go wrong” when trying to repair your own roof isn’t a question – it’s an inevitability.

We know many homeowners take pride in tackling repairs and home improvement projects themselves. Leaky faucet – easy enough. Swapping out a light fixture? A little more complicated, but doable for the advanced weekend warrior. But when it comes to your roof, the DIY mindset can quickly turn from “I’ve got this” to “I’ve made a very expensive mistake.”

It’s not uncommon for our office to get calls that start with, “Well, we tried to fix it ourselves…” Roof repairs are one of the most commonly underestimated home maintenance tasks and also one of the most dangerous. Here’s a look at the roof repairs we see homeowners often attempt on their own, and what can (and frequently does) go wrong.

Common DIY Roof Repairs Gone Wrong

1. Replacing a Few Missing or Damaged Shingles

No big deal, right? On the surface, this seems straightforward: remove the damaged shingle, nail a new one in place, seal it, and move on.

What goes wrong:

  • Improper nail placement can puncture the underlayment, creating new leak points
  • Incorrect shingle alignment disrupts water flow
  • Using the wrong type or color of shingle compromises performance and appearance
  • Sealant is applied incorrectly or not at all

In Southeast Virginia, where heavy rain and high winds are common, even small installation mistakes can allow wind-driven rain to penetrate the roof system, causing more damage than what likely would have happened if you’d left the shingle alone.

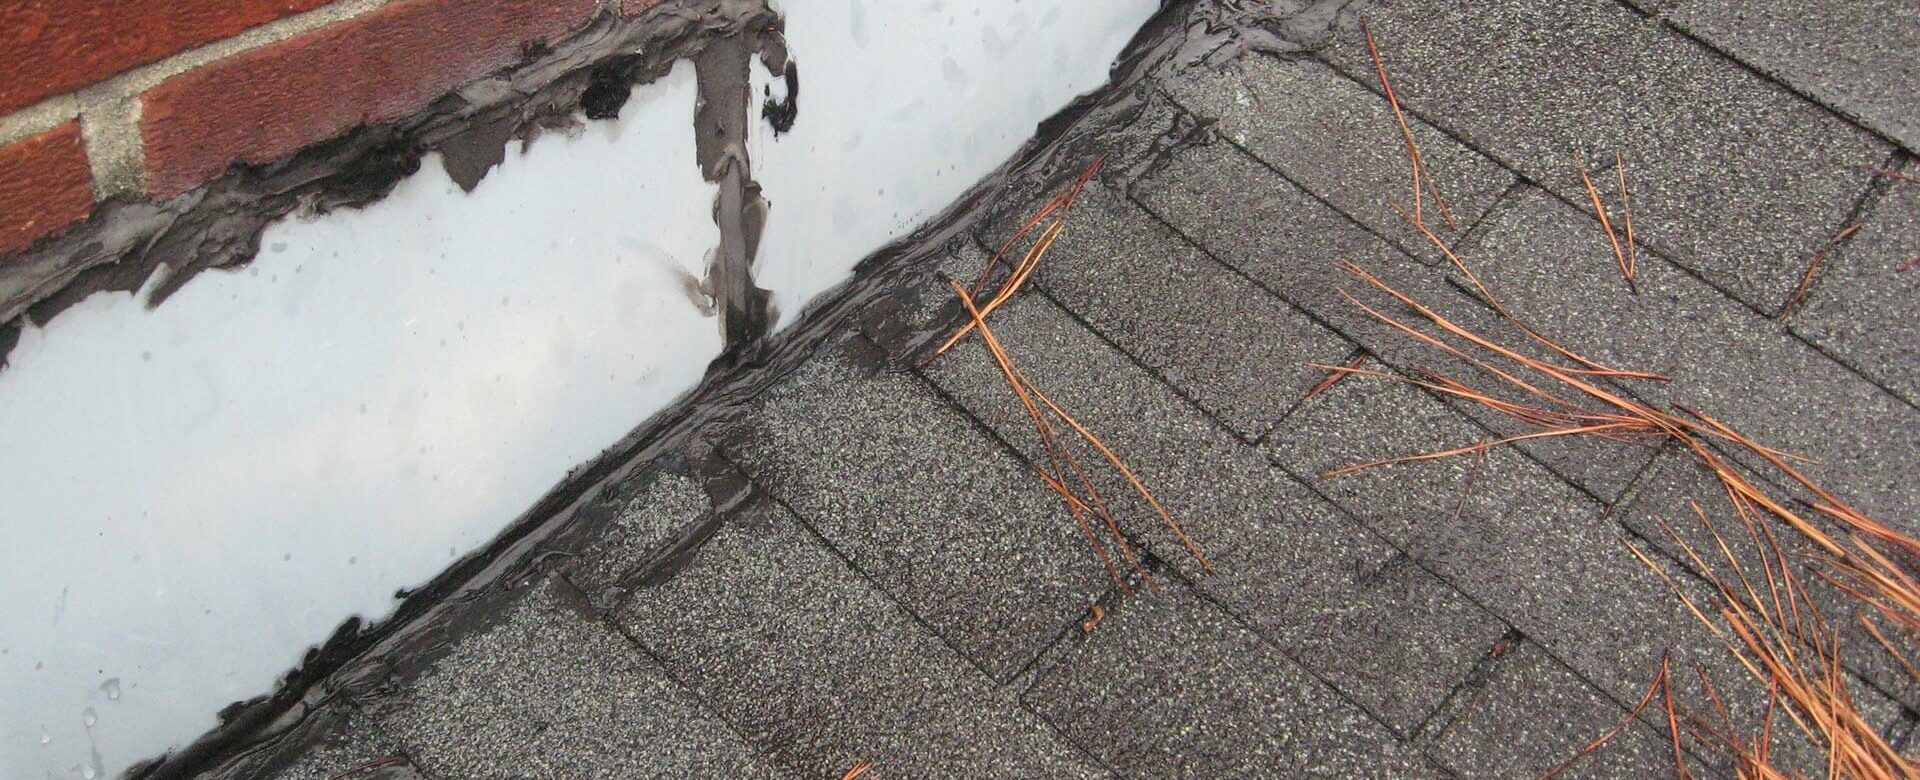
2. “Patching” a Roof Leak with Sealant or Tar

Caulk and roofing tar feel like quick, easy, and affordable fixes for a leak, and they’re often the first thing homeowners reach for. But this “quick fix” can cause long-term problems.

What goes wrong:

  • Leaks are rarely where water enters the home; they travel along decking and framing, so sealing an area where the leak has penetrated is probably not solving the problem
  • Sealants dry out, crack, or wash away over time
  • Patching the visible issue masks the underlying problem

In humid coastal climates, trapped moisture can lead to rot, mold, and decking failure long before the leak becomes obvious again, which means you’ve created a secondary problem that is now going to require structural repair.

3. Cleaning or Adjusting Flashing

Loose flashing around chimneys, skylights, and roof penetrations is a common DIY target. You can easily see the problem and the solution feels straightforward. But this fix actually takes much more skill than you would imagine.

What goes wrong:

  • Flashing is bent or reinstalled incorrectly
  • Existing waterproofing layers are damaged
  • Fasteners are driven into the wrong locations

Flashing failures are one of the leading causes of roof leaks—and one of the easiest ways for DIY work to create long-term water intrusion. Not to mention this type of work is particularly dangerous for someone not accustomed to working on roofs.

4. Gutter “Fixes” That Affect the Roof

Homeowners often clean, reattach, or adjust gutters without realizing how closely they interact with the roofing system.

What goes wrong:

  • Improper pitch causes water to back up onto the roof edge
  • Fascia boards are damaged during reattachment
  • Hidden water damage and rot go unnoticed

In areas like Hampton Roads, where sudden downpours are common, poor drainage can overwhelm roof edges and accelerate deterioration.

What DIY Roof Repairs Can Really Cost You

1. More Damage Than You Started With

One misstep—literally or figuratively—can turn a minor issue into structural damage. Water intrusion doesn’t announce itself right away, and by the time it does, repairs are often far more extensive (and expensive) than the original problem.

2. Voided Warranties

Many roofing manufacturers require that repairs and modifications be performed by licensed professionals. DIY work – even when well-intentioned and effective – can void material warranties, leaving homeowners unprotected when future issues arise.

3. Insurance Complications

If a DIY repair fails and causes interior damage, insurance companies may deny claims due to improper workmanship or unlicensed repairs. This is especially risky following storms or high-wind events common in Southeast Virginia.

4. Serious Safety Risks

This is the part that cannot be overstated.

  • Roofs are steep, slick, and unforgiving
  • Asphalt shingles become dangerously slippery in heat, humidity, or after rain, especially when covered with mold or mildew
  • Falls from even one story can result in severe injury

Every year, homeowners are seriously injured attempting roof work because they don’t have the proper knowledge, safety equipment or understanding of structural weak points of their own home. Don’t damage your home AND yourself with risky DIY repairs.

When in Doubt, Call a Professional

Professional roofers understand the composition of a roofing system, how water behaves under different weather conditions, how the regional climate impacts materials and installation, and how to work safely in their environment.

A professional roofing inspection can often catch issues homeowners didn’t even realize were connected to the issue they’ve identified, saving them from much more costly repairs down the road. So, if you’re noticing missing shingles, leaks, sagging areas, or storm damage, or even if you’re unsure what you’re seeing but you know something is wrong, calling a licensed roofing professional is the safest, smartest first step.

DIY projects have their place, but your roof isn’t one of them. Contact Andrews Roofing today.

read more

Resolve to Protect Your Home with a Seasonal Maintenance Checklist

Start the new year out right by checking a few important items off your home-maintenance to-do list.

Just like setting personal resolutions at the first of the year, resolving to take better care of your home, and especially your roof, is an investment that pays off all year long.

In Hampton Roads (HRVA), roofs face a unique combination of challenges: coastal humidity, salt air, heavy rain, high winds, summer heat, and the occasional winter freeze. Seasonal maintenance helps homeowners catch small issues early, protect their roofing system, and extend the life of their roof.

We’ve broken down your annual roof care into seasonal, home-owner safe checklists to make these tasks manageable and effective – without ever having to climb on the roof!

Winter: Monitor & Protect

While winter doesn’t usually bring heavy snow to Southeast Virginia, cold snaps, fluctuating temperatures and freezing rain can still cause issues.

Winter Maintenance Checklist

  • Watch for interior warning signs: Keep an eye out for water stains on ceilings or walls, peeling paint or unexplained humidity in certain rooms or areas.
  • Check attic moisture levels: Condensation or frost inside your attic may indicate ventilation problems, which could be fixed just by shifting insulation.
  • Monitor roof edges: Heavy icicles or uneven melting can signal insulation or airflow issues from the inside.
  • Avoid walking on the roof! Use a roof rake from the ground if necessary, never climb on icy surfaces.

Why it matters to HRVA: Our inconsistent winter temperatures can cause freeze-thaw cycles that even when brief can make existing cracks worse or create gaps around flashing.

Spring: Reset After Winter Weather

Even mild winters can leave behind hidden wear and tear, especially after wind events and fluctuating temperatures.

Spring Maintenance Checklist

  • Do a ground-level roof inspection: Look for missing, curling, or cracked shingles as well as visible damage around chimneys, vents, and flashing. Do a visual inspection to see if any sections of gutters have pulled away from the roofline and ensure all gutter downspouts are still securely attached.
  • Clean gutters and downspouts: Remove leaves, pine needles, and debris and ensure downspouts are directing water well away from your foundation.
  • Inspect attic ventilation: Look for moisture, condensation, or mildew and make sure soffit and ridge vents aren’t blocked by insulation.
  • Trim back trees and branches: Prevent damage caused by overgrown or loose limbs and reduce debris buildup during spring storms.

Why it matters to HRVA: Spring rains are frequent, and clogged gutters or compromised flashing can quickly lead to leaks if winter damage isn’t addressed.

Summer: Manage Heat, Humidity & Storm Exposure

Southeast Virginia summers bring intense heat, high humidity, and sudden thunderstorms – all of which put stress on roofing systems.

Summer Maintenance Checklist

  • Check attic insulation: Look for compressed, displaced, or damp insulation. Uneven insulation can trap heat and drive-up energy costs.
  • Monitor attic temperatures: Excessive heat may indicate poor ventilation – upper floors that feel noticeably hotter can be a warning sign.
  • Inspect roof for gaps: From the ground, check vent boots and flashing for cracking or separation.
  • After storms, perform visual checks: Look for new debris, shingle movement, or granules collecting near downspouts, which could signal shingle deterioration.

Why it matters to HRVA: High heat accelerates shingle aging, while humidity and poor ventilation can lead to moisture problems inside the attic—especially in older homes.

Fall: Clear, Seal & Prepare for Cooler Weather

Fall is one of the most important seasons for roof maintenance—and one of the best times to address minor issues, when the temperatures are more forgiving.

Fall Maintenance Checklist

  • Thoroughly clean gutters: Falling leaves can quickly cause blockages and backed-up gutters can lead to fascia damage and interior leaks.
  • Inspect flashing and seals: Pay special attention to chimneys, skylights, and vent pipes. Any loose flashing or separating seals are bound to invite issues when the winter temperature fluctuations start.
  • Check attic air sealing: Look and feel for drafts around attic hatches or recessed lighting. Drafty air or increased temperatures may indicate the need for insulation replacement or better sealing.
  • Schedule a professional roof inspection: Fall is ideal for preventative maintenance before winter weather arrives.

Why it matters to HRVA: Fall storms and lingering humidity mean small vulnerabilities can worsen quickly if left unattended.

Resolve to Protect Your Home

Resolving to care for your roof season by season is one of the smartest and easiest ways to protect your home’s structure, comfort, and value. Routine visual checks and preventative maintenance can help extend the life of your roof, reduce emergency repairs, and identify issues before they become costly problems.

Andrews Roofing is here for every season.

If your seasonal checklist reveals concerns, or if you’d simply like an expert set of eyes on your roof, Andrews Roofing offers professional inspections and maintenance services throughout the Tidewater region. Our team understands the unique demands of the local climate and can help keep your roofing system performing its best year after year. Contact us today!

read more

Should You Make an Insurance Claim for Your Roof Damage?

In Southeast Virginia and the Hampton Roads region, roofs can take a serious beating.

Between strong coastal winds, heavy rain, tropical storm systems, and intense summer heat and humidity, it’s common for homeowners to discover roof damage and wonder if it’s just normal aging—or something that should be covered by insurance.

It’s a common homeowner question that we encounter: “Should I file an insurance claim for this?” Knowing the difference between everyday wear and tear and storm-related roof damage can help you avoid unnecessary claims, out-of-pocket expenses, and frustration with your insurance provider. Here’s how you can tell the difference—and what to do next.

Normal Roof Wear and Tear: What Insurance Typically Does Not Cover

Roofing materials naturally age over time, especially in the coastal climate of Southeast Virginia. Insurance companies generally do not cover damage caused by gradual, natural deterioration or lack of maintenance. Common examples of normal wear and tear include:

  • Aging or brittle shingles that are near the end of their lifespan
  • Granule loss on asphalt shingles, typically from age and long-term sun exposure
  • Faded or discolored roofing materials
  • Minor cracking or curling that are age-related/typical
  • Small leaks caused by age—not a specific weather event

If your roof is 20–30 years old and showing these signs, it’s usually considered a maintenance or replacement issue rather than an insurable loss. In these cases, planning a roof replacement before major leaks develop is often the smartest move.

When Roof Damage May Be Covered by Insurance

Insurance typically applies when roof damage is caused by a sudden, identifiable event, such as severe weather. In Hampton Roads, this often means wind, hail, or tropical systems.

Roof damage that may warrant an insurance claim includes:

  • Missing, torn, or lifted shingles after high winds
  • Hail damage, including bruised or cracked shingles
  • Impact damage from fallen tree limbs or debris
  • Leaks that appear shortly after a storm
  • Damage from hurricanes, tropical storms, or tornadoes

If roof issues show up immediately after a major storm—or you notice similar damage throughout your neighborhood—it’s a good sign that the damage may be insurable.

Step One: Get a Professional Roof Inspection

Before filing a roof damage insurance claim, it’s important to schedule a professional roof inspection with a licensed roofing contractor that is local to the Hampton Roads region and knows our local weather as well as the local insurance providers. A trained roofer can determine whether the damage is storm-related or simply age-related. The inspection should:

  • Identify visible and hidden storm damage you may not be able to see from the ground
  • Document findings with photos and written notes which can be submitted to your claims agent
  • Provide a detailed repair or replacement estimate to give a “second opinion” to the insurance adjustor’s estimate
  • Help you decide whether filing a claim makes financial sense at all

Step Two: Complete the Insurance Claim Process

If your roofing contractor determines the damage is likely covered, here’s how the process typically works:

  1. File a Claim with Your Insurance Company. You’ll contact your insurer and provide details about the storm or event that caused the damage. This is where the information from the roof inspection will come in especially handy.
  2. Meet with the Insurance Adjuster. An adjuster inspects your roof and evaluates the damage. Your contractor can often be present to ensure nothing is overlooked.
  3. Review the Insurance Estimate. The insurance company provides an estimate outlining approved repairs or replacement, minus your deductible. You may want to have your contractor review the estimate to ensure nothing was overlooked or underquoted.
  4. Complete Roof Repairs or Replacement. Once approved, your contractor completes the work according to the claim’s scope, providing any necessary documentation for your insurance company.

Step Three: Keep It Local

Having an experienced Hampton Roads roofing contractor involved helps ensure the insurance estimate reflects the full extent of the damage as well as the cost of local labor — not just what’s immediately visible or generic.

While not every roofing issue requires an insurance claim, ignoring any type of roof damage – storm-related or otherwise, can lead to much larger problems, including interior water damage and mold. If you’re unsure whether your roof damage is normal wear or something insurance should cover, Andrews Roofing is here to help you make an informed decision. Contact us today for a professional inspection, clear documentation, and support throughout the insurance claims process —without pressure or guesswork.

read more